RECIPES
Gluten Free
Tahini Brownies

22-26 minutes
- Makes 16 servings
- Gluten Free
- 3 tablespoons cornstarch
- 2 tablespoons unsweetened cocoa powder
- 6 ounces bittersweet chocolate, coarsely chopped
- 3 tablespoons virgin coconut oil
- 4 tablespoons tahini, divided
- 2 large eggs
- ⅓ cup granulated sugar
- ¼ cup (packed) light brown sugar
- 1 teaspoon kosher salt
- 1 teaspoon vanilla extract
- 1 tablespoon light agave syrup (nectar)
Step 1
Preheat the oven to 350°. Line an 8×8″ baking dish with 2 overlapping pieces of parchment paper, leaving at least a 3″ overhang on 2 sides.
Step 2
Whisk cornstarch and cocoa powder in a medium bowl until no lumps remain. Heat chocolate, oil, and 1 Tbsp. tahini in a small saucepan over low, stirring, until melted and smooth.
Step 3
Using an electric mixer on medium-high speed, beat eggs, granulated sugar, and brown sugar in a large bowl until light, smooth, and doubled in volume, 3–4 minutes. Beat in salt and vanilla to combine, then beat in chocolate mixture, scraping down sides as needed, until incorporated. Beat in cornstarch mixture, then increase speed to medium-high and beat until mixture is thick and holds its shape, about 30 seconds.
Step 4
Stir agave syrup and remaining 3 Tbsp. tahini in a small bowl. Scrape batter into prepared baking dish and smooth top. Dollop agave mixture over and swirl into top of batter with a skewer or toothpick.
Step 5
Bake brownies until the sides are puffed, top is browned, and a tester inserted into the center comes out with a few moist crumbs attached, 22–26 minutes. Let cool before removing from the pan and cutting into 16 squares.
Step 6
Do Ahead: Brownies can be made 3 days ahead. Wrap in plastic and store at room temperature.
Gluten Free Sweet and Sour Chicken

25 minutes
- Makes 8 servings
- Gluten Free
For the sweet and sour chicken:
- 1 lb. chicken breast meat cut into 1″ pieces (about 2 breasts)
- 1 tablespoon tamari
- 1/2 teaspoon garlic powder
- 1/2 teaspoon kosher salt
- 1/4 teaspoon black pepper
- 1/4 cup cornstarch more if needed
- 1/4 cup canola oil or other neutral tasting oil (for frying)
- 1 bell pepper diced (any color is fine)
- 1/2 cup diced pineapple canned or fresh
- 1/2 cup diced red onion from about 1 small or 1/2 large onion
- sesame seeds and green onion for garnish, optional
- cooked rice or noodles for serving, optional
For the sweet and sour sauce:
- 1/4 cup brown sugar
- 1/4 cup honey
- 1/4 cup ketchup
- 1/4 cup rice vinegar
- 1/4 cup water
- 1 teaspoon Sriracha more or less depending on spicy preference
- 1 tablespoon tamari
- 1 teaspoon garlic powder
Step 1
In a medium bowl, mix together the tamari (1 tablespoon), garlic powder (1/2 teaspoon), kosher salt (1/2 teaspoon), and black pepper (1/4 teaspoon). Add the diced chicken to the bowl and toss to coat. Allow to marinate for at least 5 minutes.
Step 2
While the chicken is marinating, mix together all the ingredients for the sweet and sour sauce in a small bowl or glass measuring cup (1/4 cup brown sugar, 1/4 cup honey, 1/4 cup ketchup, 1/4 cup rice vinegar, 1/4 cup water, 1 teaspoon Sriracha, 1 tablespoon tamari, and 1 teaspoon garlic powder). This is also a good time to dice the pepper and onion, if you haven’t already.
Step 3
Sprinkle the cornstarch (1/4 cup) on top of the chicken and toss to coat each piece evenly. Use a couple tablespoons more if there isn’t enough to coat each piece.
Step 4
Heat the canola oil (1/4 cup) in a large skillet or wok (I prefer nonstick) over medium-high heat. Add the chicken and fry until crispy and fully cooked, flipping occasionally, about 5-8 minutes. Once fully cooked, remove to a plate.
Step 5
Add the diced bell pepper, diced red onion (1/2 cup), and diced pineapple (1/2 cup) to the skillet. Sauté over medium-high heat until browned and softened, about 3-5 minutes.
Step 6
Turn the heat to medium-low and pour the sauce into the skillet. Stir and simmer until the sauce has thickened a bit, about 2 minutes.
Step 7
Add the chicken back into the skillet and stir to coat in the sauce and veggies.
Step 8
Serve over cooked rice or noodles, garnished with sesame seeds and sliced green onions (optional).
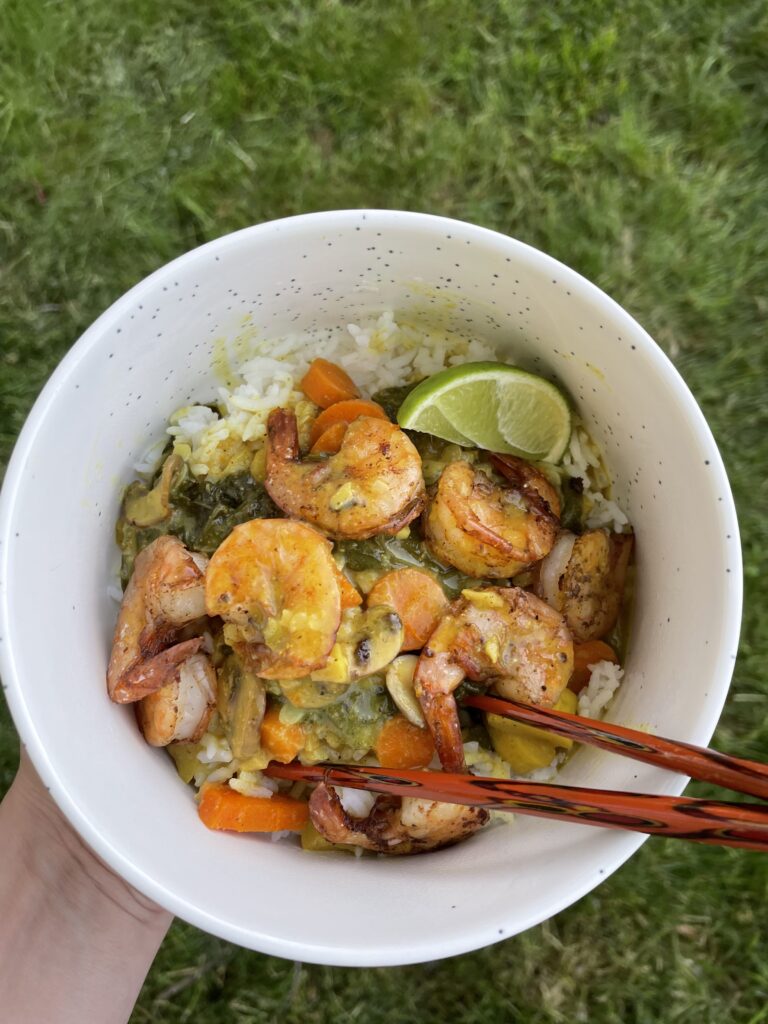
Shrimp and Yellow Curry
30 minutes
- Makes 3-4 servings
- Gluten Free
- Low FODMAP
- 1 can unsweetened coconut milk
- 4 tbsp Olive oil (2 for sautéing vegetables, 2 for sautéing shrimp)
- 1 tsp Fish sauce
- 2 tbsp yellow curry powder (more or less to taste)
- Salt + Pepper to taste
- 1 cup sliced mushrooms
- 1 yellow squash
- 2 large carrots
- 2 cups chopped chard
- 1 tbs minced ginger (1 inch knob)
- 8-9 oz frozen shrimp (depends on size
- Lime juice and cilantro (optional)
- Start the rice first! Rinse rice and cook, 1 cup rice: 2 cups water.
- Thaw frozen shrimp by running under cold water in a strainer
- Chop carrots, summer squash, and Swiss chard into quarter sized pieces
- slice mushrooms
- Dice the ginger
- sauté all veggies together with ginger and olive oil in a large pan on medium heat
- Add coconut milk to the pan with the veggies
- Add curry, fish sauce, salt, and pepper, stir for a minute to incorporate
- Decrease heat to a simmer, and cover for 10-15 minutes
- In a separate pan, heat olive oil on medium high, add thawed shrimp and sauté for 3-4 minutes on each side
- Salt and pepper the shrimp to taste
- Once the curry has reduced and thickened to your liking (I usually simmer for at least 15 minutes and 5 more uncovered) it’s ready!
- Serve over white or brown rice and top with the sautéed shrimp
- Especially tasty with cilantro and a squeeze of lime
GF Chocolate Chip Banana Bread Muffins

15 minutes to prep, 30 minutes to bake
- Makes 12 muffins
- Gluten Free
- 3 medium bananas
- 1 and 2/3 cups all purpose gf baking flour OR (2/3 cup oat flour, 2/3 cup almond flour, 1/3 cup brown rice flour)
- 1 and 1/2 tsp baking powder
- 1/2 tsp baking soda
- 1 tsp cinnamon
- 1/2 cup brown sugar
- 1/2 tsp salt
- 1/2 cup (1 stick) unsalted butter
- 2 medium eggs
- 1 tsp vanilla extract
- 1/2 cup chocolate chips
- Preheat the oven to 350 degrees F
- In a bowl, mash the bananas with a fork until smooth
- In a medium mixing bowl combine brown sugar and butter and cream together using a hand mixer (or fork if you’ve got super baker arm and hand strength)
- In a separate mixing bowl, combine all the remaining dry ingredients (flour, baking powder, baking soda, cinnamon, salt) except for the chocolate chips, and whisk together.
- Combine creamed butter and sugar with the eggs, mashed banana, and vanilla.
- Slowly, while stirring, combine the dry ingredients to the butter, sugar, vanilla, banana and egg mixture.
- Finally, fold in the chocolate chips.
- Using your finger, grease the cups of your muffin tins with butter or you can use a cooking spray.
- Pour muffin batter into the tins leaving about a half inch of space at the top of each cup for rise.
- Bake for roughly 30 minutes, or until golden brown. I check mine at 20 minutes of bake time with a tooth pick. If the pick comes out clean, they’re done!
- Remove from oven and let cool for about 15-20 minutes.
- I like to pull my muffins from the tins when they’re cool enough to touch.
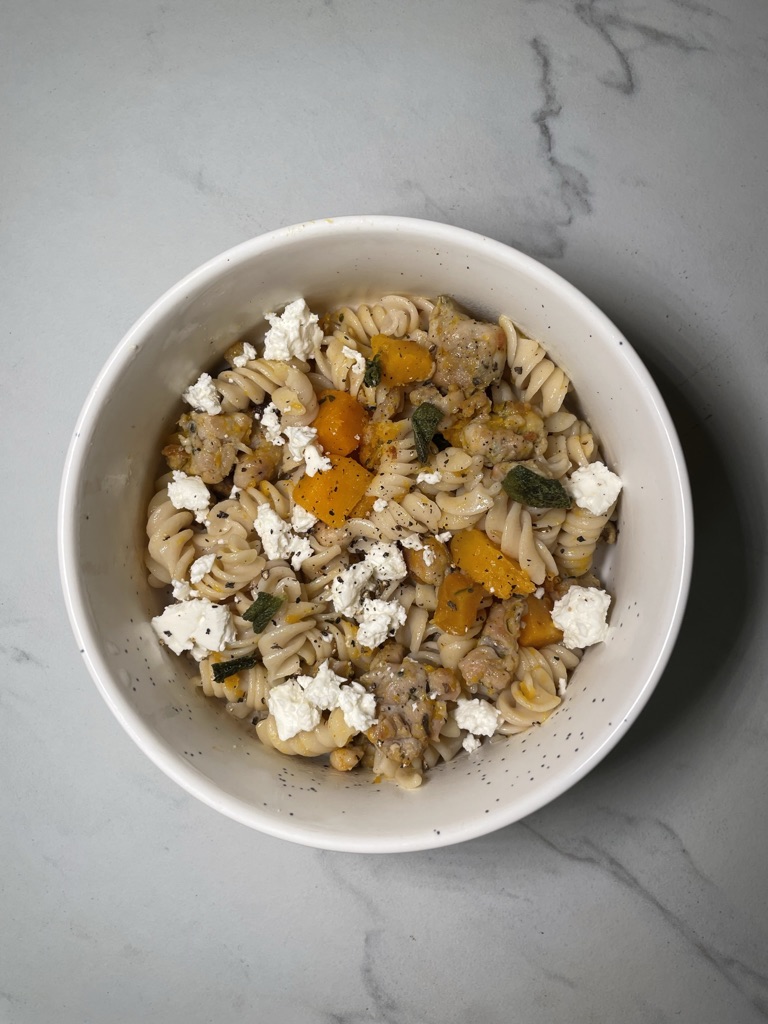
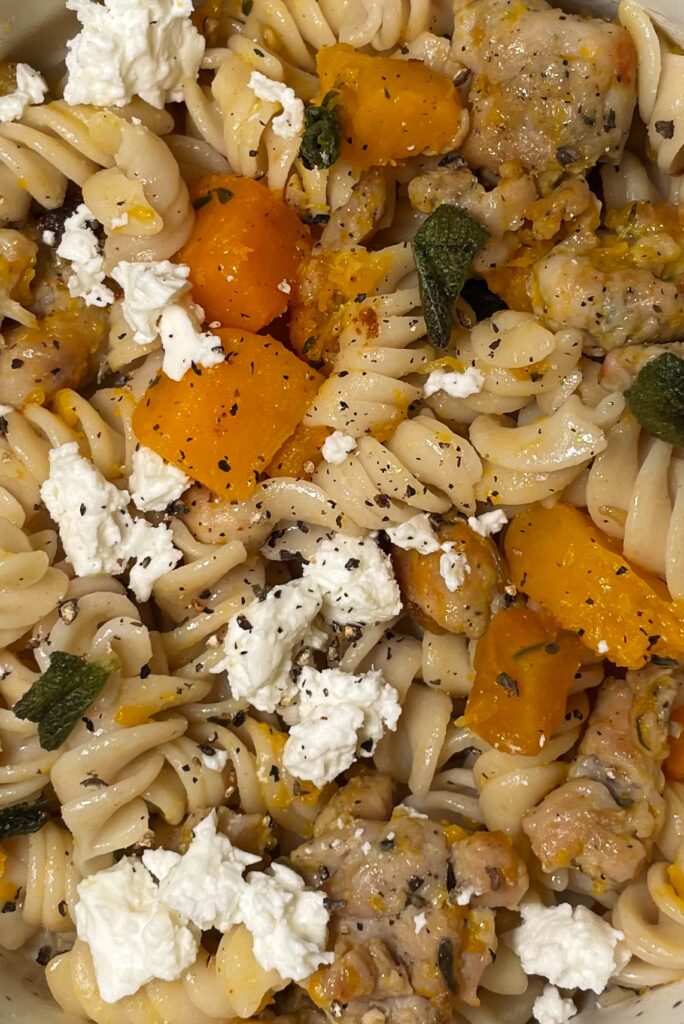
GF Roasted Butternut Squash, Sage and Chicken Sausage Rotini
15 minutes for pasta and sausage, butternut squash was pre-roasted
- Makes 6 servings
- Gluten Free
- I’m using butternut squash that I roasted ahead of time for this recipe*
- 1 12oz box of GF pasta, I used Tinkyada Brown Rice Rotini
- 2 Italian chicken sausage links (about 6 oz)
- 2 cups of roasted cubed butternut squash
- 1/2 oz fresh sage (about 1 package)
- 4 tbs olive oil (2 tbs for sautéing, 2 tbs for dressing pasta)
- 1 tsp salt
- 1 tsp black ground pepper
- (optional) Feta or Parmesan cheese
- Boil a large pot of water (4.5 qts)
- In a large sauté pan, on medium burner setting, heat 2 tbs olive oil
- Remove sausage casing if you’re using links, and add ground sausage into the pan when the oil begins to sizzle.
- Once the sausage begins to brown, add in roasted squash and sage
- Sauté until fragrant and brown, about 7-8 minutes
- When water comes to a boil add in pasta and set a timer for 7 minutes, cook until al dente
- Reduce heat to a simmer, add cooked pasta to squash and sausage pan, add 2 tbs olive oil, salt, and black pepper and toss until fully coated
- As an optional add on I love to top with a goat feta, or Parmesan cheese
- Add extra s&p to taste
- Serve and enjoy!
- Pre heat oven to 400 F
- Peel and remove the seeds of one large butternut squash or other seasonal squash
- Chop squash into 1 inch cubes
- On a large sheet pan, spread cubes out in a single, even layer
- Dress with 2 tbs olive oil, s&p and any other spices of your choice, for this one I also used thyme and sweet paprika
- Roast for about 15 minutes, until slightly browned and you can stick a fork completely through
- Keep for up to 5 days in the fridge, excellent for pastas, salads, and soups!
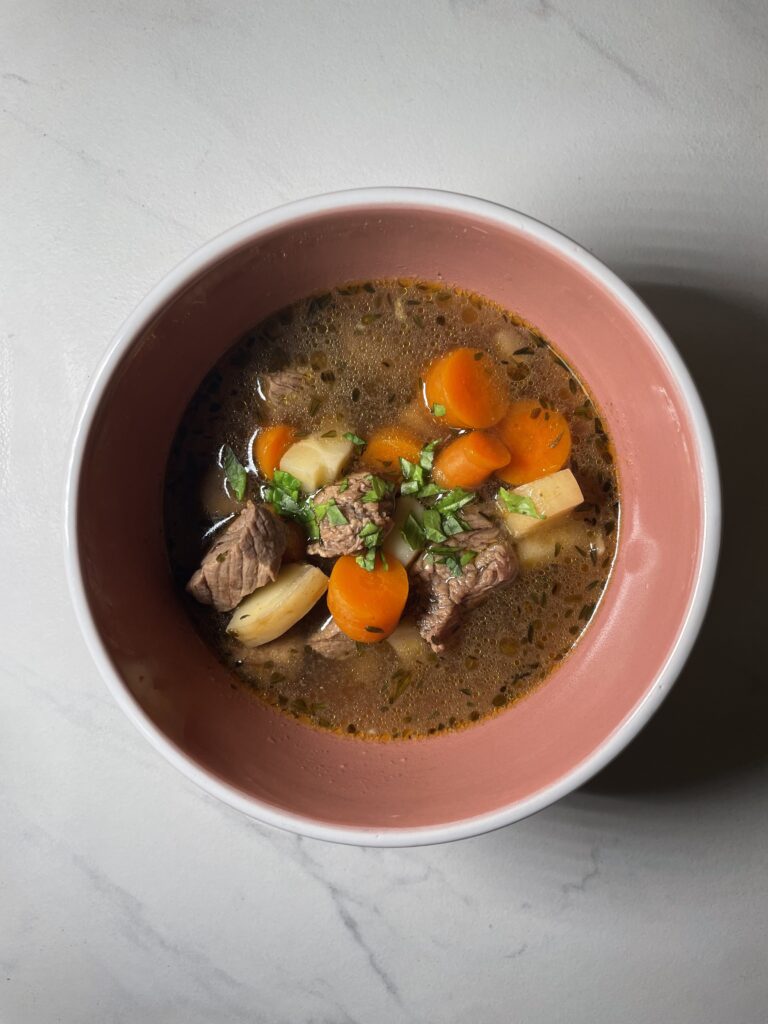
Bison and Winter Veg Stew
10 minutes prep time
35 minutes in the instant pot
- Makes 6 servings
- Gluten Free
- Bison is an awesome red meat option! It is more lean than beef, always free range, and higher in Omega-3 than beef.
- Packed with A, D, K and B vitamins as well as selenium, iron, and zinc. Also a good source of fiber and hydration!
- 8 oz Bison Ribeye
- 2 medium Carrots
- 1 medium Parsnip
- 1 cup chopped Cremini Mushrooms
- 2 cups Beef or chicken broth
- 2 tbs Fresh garlic or 1 tsp Garlic Powder
- 1 tbs Olive oil
- 2 tsp Sriracha or Tabasco
- 1 tsp Thyme
- 1 tsp Oregano
- 1 Bay leaf
- 1/2 tsp Paprika
- 1 tsp Salt
- 1/2 tsp Black pepper
- 2 cups of water
- Cut bison ribeye into 1 inch cubes
- Mince the garlic finely
- Chop parsnips, carrots, and mushrooms into 1 inch pieces
- Add olive oil to pot and bring up to medium heat, brown the bison pieces (~5 minutes), use sauté function if using an Instant Pot
- Add all chopped veggies and garlic, spices, and hot sauce into the pot
- Pour in the broth and the water
- IP: set to pressure cook for 35 minutes, cover and close vent
- Stovetop: cover with a heavy lid and cook over low-medium heat for 1-2 hours until the bison is tender.
- Pair with buttered toast and enjoy the warmth!